(Administrator and Partner logins only)
Your RBS Software comes with Server and Endpoint modules. The Endpoint software should be customized for your Remote Backup Server before you distribute it.
To use your software you must first customize it, at least through the Customization and Branding screen and the Endpoint Options screen. This is where most mistakes are made when setting up an RBS software system for the first time. Please be careful.
You will use this section to customize your Endpoint software so it looks and acts like you want it to when your customers install it. This is a very powerful function that allows you to fully brand your own RBS Endpoint software.
This allows you to deliver a highly customized Remote Backup solution to a wide range of customers - from those who want to completely manage their own backups to those who want a simple one-touch set-and-forget solution with few options.
This feature creates customized self-installers (single .EXE files) for your Endpoint software at the touch of a button that can be distributed over the Internet, as an Email attachment, by CD, or on a local network.
All of the settings that can be changed using the Web Manager PlugIn have on-screen instructions. There are 300+ other settings that can be changed by editing .REG files or .INI files. Advanced Instructions for editing these files can be found in the Customizing & Installing the Endpoint Software section of the RBS Server's help file.
Your screens may differ slightly from these examples.
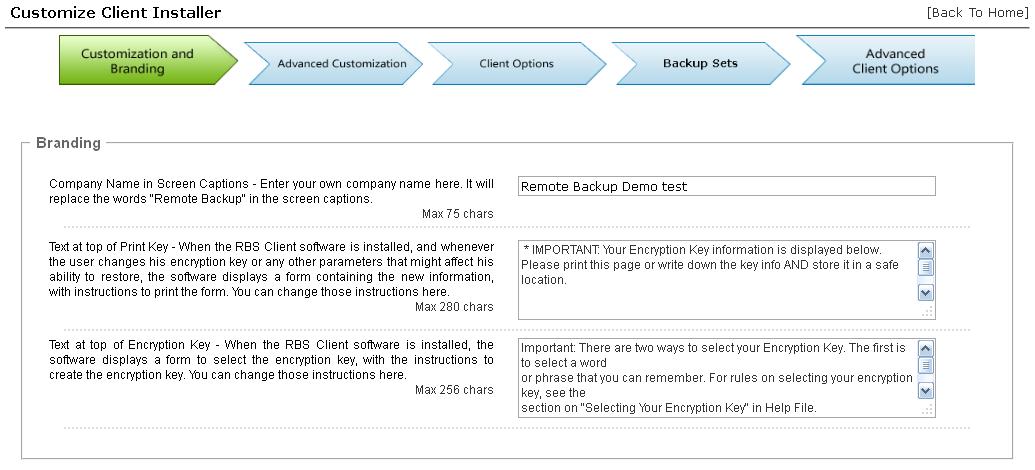
The Customization and Branding Screen


The Advanced Customization Screen


The Endpoint Options Screen
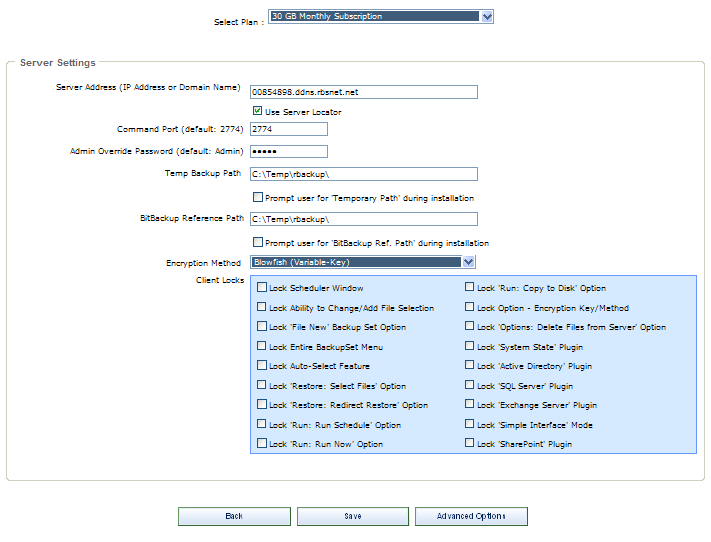
The Endpoint Options screen sets up the most important parts of the Endpoint installers.
Select Plan - Select the Plan to which you want to apply these changes.
RBS Server IP Address - Enter the RBS Server's IP Address or Domain Name here. If you select Use Server Locator, your Server Locator Host Name will automatically be entered here. Your Server Locator Host Name is your serial number + ".ddns.rbsnet.net" like this:
12345678.ddns.rbsnet.net
Read more about the Server Locator here.
You can enter as many as 32 IP addresses or Domain Names here representing 32 RBS Servers, separated with semicolons, as long as the total length of the input does not exceed 255 characters. The Endpoint software will try the Servers in sequence until one of them answers. This is useful if you have two mirrored RBS Servers operating as fail-overs, or multiple RBS Servers sharing a common drive:
server1.domain.com;server2.domain.com;myfailover.com
In the Evaluation version, enter your RBS Server's PUBLIC IP ADDRESS here to create Endpoints that can connect from OUTSIDE your network. Enter its PRIVATE IP ADDRESS to create Endpoints that can connect from INSIDE your network.
What's my Public IP Address? - You can see your Public IP Address on the RBS Web Site. Go to http://remote-backup.com/support/
Admin Override Password - Some features of the Remote Backup Endpoint can be changed on the Endpoint software itself after entering an override password. Pick your override password and enter it here. Please note that this is CASE-SENSITIVE. This password is used at the Endpoint to change Administrator's features. See the RBS Server's Help File - Endpoint Administrator's Override for more information.
Temp Backup Path - This is the location on the Endpoint's hard drive where temporary files are stored during backup processing.
BitBackup Reference Path - The location of the BitBackup Data Store. BitBackup stores a copy of all the files selected for backup using the BitBackup method (on the Schedule Screen). The space required for this storage space is the total native file size of all files for which BitBackup has been selected.
Encryption Method - Select the default encryption method. You can select from seven types: Two kinds of DES, Triple DES, Blowfish 448-bits, AES 128-bits, AES 192-bits, and AES 256-bits.
Endpoint Locks - You can lock out certain features of the Endpoint software, preventing end users from using them. For example, if you don't want Endpoints to be able to change backup schedules or change file selections, select Lock Scheduler Window and Lock Ability to Change/Add File Selection.
Endpoint Locks are useful when you want to distribute a pre set-up version of the Endpoint software with few options. This allows you to better control your costs and reduce support issues associated with users who might misconfigure the software.
The Backup Sets Screen
The Backup Sets screen consists of four tabs used to define all backup sets associated with all plans. You can create new backup sets and delete backup sets.
Backup Type/Schedule Tab
A Backup Set is a set of features that defines a way the software will perform a backup session - When the backup will run, how it will select files, which files it will select, how long it will retain files (and under what conditions,) which files will be excluded from file selection screens, and other criteria.
Each end user, and each Plan, can include multiple backup sets. There is no limit to the number of backup sets that can be defined.
This is a very important part of defining your service to end users, and you should invest time in planning. See the Remote Backup Systems web site for Best Practices documents to help you decide how to set up your Backup Sets.

Backup Type Box
Incremental - Entire files will be backed up which have been modified since the last backup. Then, after they are backed up, the files will be marked on the disk as having been backed up. This is the default and most widely-used way to back up data files.
Differential - Entire files will be backed up which have been modified since the last backup, the same as Incremental. However, after the files are backed up, they will not be marked as having been backed up. The reason for this option is in case you also want to do tape backups as well as remote backups. Your tape backup software relies on the marks placed on the files to determine which files need to be backed up. So, you don't want to remove them with your Remote Backup.
Full - Entire files will be backed up regardless of whether they have been changed since their last backup. This is the least-used option because it results in the largest Backup Sets and longest on-line times.
BitBackup - Only the parts of files that have changed will be backed up. This option creates sub-file or "patch" backups. This creates the smallest backups that take the least amount of time, and is the recommended default setting. For more information on how BitBackup works, see How BitBackup Works.
BitBackup Threshold Settings Box
BitBackup is a special kind of backup that backs up only the changed parts of files instead of the full files. It is sometimes called "sub-file" backup or "patch" backup. BitBackup is especially useful for very large files when only small parts of the files change between backups. For a complete explanation, see How BitBackup Works.
For example, if only a five-character word changes in a 2 megabyte document, BitBackup will back up only five characters. This can save large amounts of storage space on the Server, and it can significantly speed up the time needed to do a backup.
BitBackup always backs up a full file the first time. Thereafter, it backs up only the changed parts of the file. Each of the BitBackup backups sent after a full backup can restore the file up to the point in time when that backup was done, called cumulative backups. So, as time goes on, BitBackup archives become larger as they contain more changes.
Periodically, BitBackup needs to reset - a process called Roll-Forward. To do this, Remote Backup sends the full file again, and then resets BitBackups, which reduces their file size back to the minimum. This process cycles according to the settings at the bottom of this screen.
Roll-Forward Threshold - This is the number of BitBackups that will be done before Remote Backup resends the full file again.
Threshold Size - The percentage of BitBackup size to full-file size. In the example on this screen, when the size of the most recent BitBackup archive exceeds 50% of the size of the full file, Remote Backup will perform a Roll-Forward, re-sending the full file.
Using the Threshold Size feature instead of the Roll-Forward Threshold setting takes more time during preparation of a backup, because Remote Backup needs make a BitBackup archive to compare its size to the full file.
Differential Mode - Select this checkbox to set a Backup Set defined as BitBackup to operate in Differential Mode. Differential Mode in BitBackup operates the same way as Differential Mode for entire files, except that with BitBackup only the parts of the files that have changed are transmitted to the RBS Server. Archive bits are not reset. This setting is useful if you need to coordinate your Remote Backups with local Tape backups.
Make Default Button - Click the Make Default button to make all the settings on this sub-tab the defaults for all new Backup Sets created by the Endpoint.
The Schedule Box
This is where you can select different schedule types.
Daily - Selecting this option will launch a backup every day, seven days a week.
Weekly - This schedule lets you select which days of the week to do a backup.
Monthly - On this schedule you can select the first, second, third, fourth or fifth of any day of the week. Here are some examples: You can pick the first and third Wednesdays of each month. You can select the second Tuesday and Thursdays. There are a lot of possible schedules you can use here.
Once Only - This schedule will launch a single backup session, one time only, on a specified date you can pick from a pull-down menu containing a calendar.
On Demand - Pick this selection if you want this backup set to be launched on demand only - not through the scheduler. You can then launch this backup set through the Run: Run Now menu choice in the Endpoint software. You can also run it through Windows Scheduled Tasks.
For each of these schedules you can select a Start Time and an Attempt Window. It is important to remember that the Start Time is on a 24-hour schedule, and that anything after midnight is the next day. This means that if you want to back up Friday's work, and you want the backup session to take place after midnight, you should select a time early in the morning of Saturday, not Friday.
The Attempt Window is the number of hours Remote Backup will attempt to perform the backup. Selecting a start time of, for example, 1:00am will not necessarily cause the backup session to start at 1:00am, although it might. Remote Backup might not be able to perform a backup for a variety of reasons - the Server is too busy, files are locked, the computer isn't turned on.
In the event that Remote Backup can't perform a backup at the selected Start Time, it will attempt the backup session some time during the next period of time determined by the number of hours you select here.
Use Task Scheduler - Select this checkbox to use the Windows Task Scheduler to launch this backup set instead of using RBackup's built-in scheduler. Some applications have the potential to interfere with RBackup's built-in scheduler, especially when RBackup is running in Service Mode. It is generally considered more reliable for wide-scale distributions to use the Windows Task Scheduler.
Auto Select Filter Tab
RBackup has two basic ways to select files - Manual file selection and AutoSelect. Use this tab to pre-select sets of files to back up or exclude from backups in the currently selected Backup Set.
Manual File Selection: Manual file selection is used when you want to back up a specific folder or file. You simply Include (with a green checkmark) or Exclude (with a red X) specific folders and files.
AutoSelect File Selection: AutoSelect can back up files by file type regardless which folder they are in. For example, if you want to back up all Microsoft Word document (.doc) files, you can select the .doc file extension in the AutoSelect menu. Remote Backup will scan the entire file system (or just selected parts of it) and will back up Microsoft Word document files wherever they are found.
AutoSelect is especially useful for quick, end user installations when files are not kept strictly in specific folders.
AutoSelect can be turned ON or OFF for each Backup Set. To turn it ON, select Turn ON. To turn it OFF, select Turn OFF.
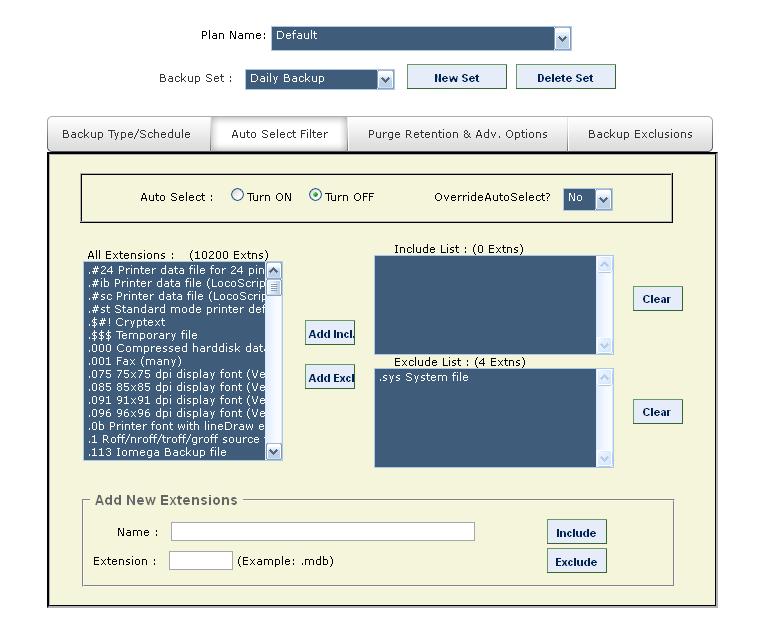
Override AutoSelect - By default, AutoSelect scans all hard drives that are not specifically excluded by a Red X, beginning at the root of the drive and working its way through all folders. You can override this behavior and make AutoSelect scan only folders that are selected with a Green Checkmark. This will speed up the scanning process and limit file selection, at the expense of missing files that are not in the included folders.
You may want to do this if your users will be backing up only files contained within certain folders, like My Documents. It could shorten backup times and lower the amount of storage space required.
To override AutoSelect's default method of scanning all attached drives, and have it scan only folders marked with a green checkmark, select YES for Override AutoSelect.
To pre-select file types to back up, simply select the file type from the List Of All Extensions list, and click the Add Incl button to Include the file type, or the Add Excl button to Exclude the file type.
If you don't find file type you need in the List Of All Extensions, you can add it yourself using User-Defined Extensions.
When you are finished editing the AutoSelect Filters, click the Apply button.
Purge Retention & Adv. Options Tab
This tab contains advanced options for backup sets.

Keep latest version of files online - Check this setting if you want to keep the most recent version of a file regardless the other settings on this screen. For example, assume you have set Purge Files older than to 30 days. If you only have a single copy of a file within that time frame, and you do not checkmark this option, that file will be erased when its age is over 30 days. If you checkmark this option, that file will be retained regardless of its age until a more recent one appears at your RBS Server.
Purge Files older than - Use this setting to set the retention period of the files in this Backup Set to a number of days. In this example, files will be retained for 30 days and then erased from the RBS Server.
Number of Backup Sets to Keep Online - When Purge Files Older Than is not selected, this option becomes available. You can select a number of backup sets to keep online, and have the Endpoint software delete old backup sets (all the files in a backup set) in a First-In-First-Out method. For example, if you have this set to 7, when the 8th Backup Set is stored, the oldest backup set will be deleted.
Purge if deleted/unmarked - Select this checkbox to automatically delete files from the Server at the end of their retention period if they are deleted from the Endpoint or if they are deselected (unmarked) by the Endpoint.
Compression Level - Set the desired compression level for the files in this backup. Normally, leave this at Medium unless instructed to do otherwise by an RBS technician.
File Selection - This sets the way RBackup selects files for backup. The recommended setting for most backup sets is Fast Pick.
Archive Bit - If set to Archive Bit, RBackup will select files that have changed since the last backup, according to the archive setting for the file. This is a very fast way to select files. However, if another program resets the archive bit before the backup, the file might not be selected for backup.
Modified Date/Time - Setting the File Selection Criteria to Modified Date/Time has two advantages and one disadvantage: It can select files for backup regardless of the archive bit, so it's generally more reliable; and it will always do a first full backup, then automatically switch to Incremental Mode (a very handy feature). Its disadvantage is that during a backup session the file selection process is slower than using the archive bit - sometimes quite a bit slower. This might not matter, however, if backups are done at night when nobody is using the computer.
Fast Pick - This method is designed to speed up the Scanning process (or File Selection process), especially in cases where there are many thousands of files to scan, (greater than 50,000) and where Archive Bit Selection is not appropriate.
Fast Pick relies on the last successful backup's Date/Time Stamp. For the first backup, Fast Pick will always do a full backup. For subsequent backups, files that have been added or changed since the last backup (selected by date/time) will be backed up.
This method of selection is useful when you are backing up a file sever (for example) that has many thousands of files that need to be scanned, or in cases where archive bit cannot be used for file selection (like a Samba/Linux box).
IMPORTANT: If, after the initial backup using Fast Pick, you make changes to File Selection, (include a new file or folder to backup), the Modified Date/Time must be reset for these new inclusions. Otherwise, these files will not be selected for backup. If users change file selections with Fast Pick turned on, they will be prompted to change the date, and the software will do it for them.
Session Quota - You can set a limit on the amount of data an individual Backup Set can send to the Server in a single session. You might want to do this to limit a first backup from an Endpoint who has a large amount of data, so that it sends the first backup over a series of backup sessions rather than all at once. You can also use this to help define different backup plans for sales and pricing purposes. Select the Session Quota in megabytes or gigabytes, OR set the Session Quota to Unlimited with the checkbox.
LogOff/Shutdown - You can set the Endpoint computer to either log off the current user or shut down the computer at the end of the backup session.
Backup Exclusions Tab
This tab is used to set default Exclusions for the selected backup set. Default Exclusions are files and folders that cannot be selected for backup, and do not appear in the file view. Files and folders are excluded based on wildcards and Virtual Folders, and are customizable by backup set.

Wildcard File Exclusions
Use this option to exclude files using Wildcards. Separate exclusions with semicolon (;). File and folder names are not case-sensitive. Click on Edit to add wildcards. To save, click on Update. Note: Files that match these wildcards will NOT be displayed on the Endpoint interface.
This feature accepts the following formats:
Files starting with: (Format: starting {chars} of the filename followed by *)
Examples:
~* This will exclude all files whose filename starts with tilde (~).
Temp* This will exclude all files whose filename starts with ‘Temp’.
Files ending with: (Format: * followed by ending {chars} of the filename)
Example:
*temp This will exclude all files whose filename ends with ‘temp’
By file extension: (Format: * followed by a period (.), then the file extension)
Example:
*.sys This will exclude all files with .sys extension.
By Wildcards: (Format: * followed by {chars} to match, and then ending with a *)
Example:
*tmp* This will exclude all files whose filename has the string ‘tmp’
Wildcard Folder Exclusions
Use this option to exclude folders using Wildcards. Separate exclusions with semicolon (;). Not case-sensitive. Click on Edit to add wildcards. To save, click on Update.
Note: Folders that match these wildcards will NOT be displayed on the Endpoint interface.
This feature accepts the following formats:
Folders that exactly match with: (Format: ? followed by ‘foldername’ followed by ?)
Example:
?Windows? This will exclude files where the folder name matches ‘Windows’ anywhere in the entire file path.
Folder name starts with: (Format: ? followed by starting chars of folder name followed by *?)
Example:
?Sys*? This will exclude files where the folder name starts with “sys”
Folder name ends with (Format: ? followed by * followed by ending chars of folder name followed by ?)
Example:
?*32? This will exclude files where the folder name ends with “32”
Folder name LIKE: (Format: ? followed by * followed by chars to match followed by * followed by ?)
Example:
?*temp*? This will exclude files where the folder name is LIKE “temp” anywhere in the file path.
Virtual Exclusions
Use this section to select standard Windows virtual folders for exclusion. Virtual Folders are folders that might not have the same name from computer to computer, but are defined by these virtual names.
Select the following virtual folders to exclude from backup:
Note: Virtual folders marked for exclusion will NOT be displayed on Endpoint interface.
Windows Folder
C:\Windows or C:\Winnt
Temporary Folder
System Temp folder. Example: C:\Documents and Settings\Administrator\Local Settings\Temp
Internet Cache Folder
Temporary Internet Files: C:\Documents and Settings\Administrator\Local Settings\Temporary Internet Files
System Folder
Windows System folder. Example: C:\Windows\system32
Cookies Folder
Cookies folder. Example: C:\Documents and Settings\Administrator\Cookies
History Folder
Example: C:\Documents and Settings\Administrator\Local Settings\History
Application Data Folder
Example: C:\Documents and Settings\Administrator\Local Settings\Application Data
The Advanced Endpoint Options Screen
This screen contains advanced options for the Endpoint installer. The default selections are the most popular and appropriate for most backup sets.
For information on the Pre Batch File and Post Batch File see the documentation for the RBS Manager.


