The two Restore Agents are very small programs that can restore your clients' data without installing the RBS Client software. They are unique to your RBS Server, so they have to be built using the Customize Client Installer utility after you have installed your RBS Server. We suggest you build them at the same time you build your Client installers, since they are on the same set of screens.
The Web Restore Agent allows your clients to restore their files online, to any computer, without installing the Client software. (Available in select versions.)
The Web Restore Agent can be posted on your web site as a single .EXE file. It can restore files for your clients over the web to any computer, even those without a copy of the Client software. The download is completely secure. The Web Restore Agent uninstalls itself after it has been used, so it is safe to use on a public computer.
The Web Restore Agent that you build from your RBS Server will work only with your RBS Server. To use the Web Restore Agent, the end user must know his Username, Password, and Encryption Key (or have his Key File available.)
Find out how to build the Web Restore Agent using the Customize Client Installer function in the "Customizing and Installing the Client Software" chapter.
To make the Web Restore Agent available to your end users, post it on your web site as a download. You can do this with a text or a graphical link:
<a href="/webrestoreagent.exe">Restore Your Files Online</a>
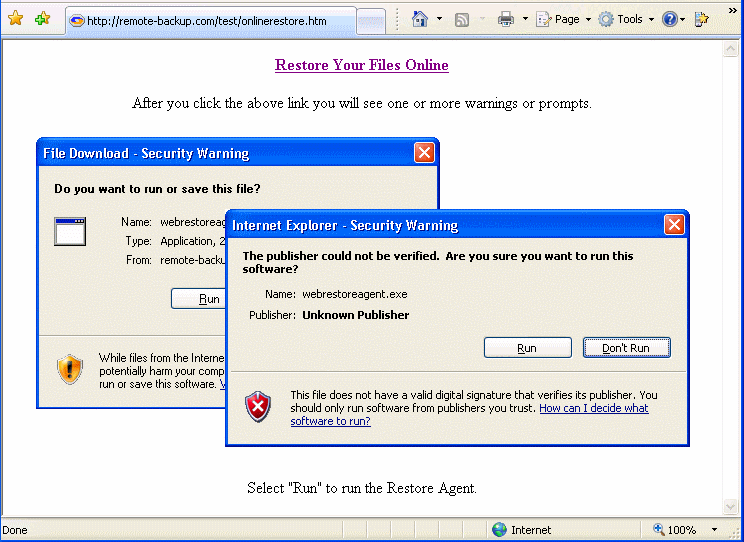
In this example, the Web Restore Agent is named "webrestoreagent.exe" When your end users click the link "Restore Your Files Online" the Web Restore Agent will download. Your web page might look something like this:

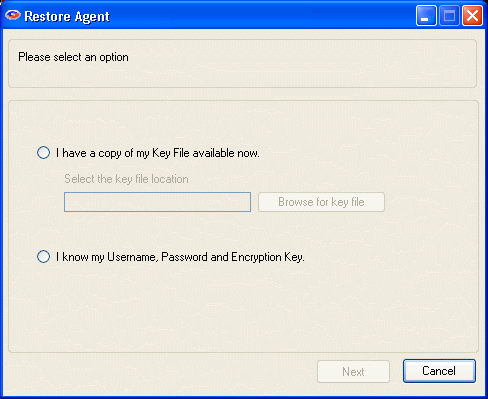
The first screen of the Web Restore agent allows the user to select the method of entering the details needed to download and decrypt the data.
Whenever a user installs the Client software, or changes his Encryption Key, the Client software gives him the option to create a Key File. The Key File contains the user's login credentials, encryption key, and encryption method, in a strongly encrypted format. The Key File can be used later to perform a Disaster Recovery, or it can be loaded onto a memory stick to be used later for a highly secure Web Restore using the Web Restore Agent.
To restore using the Key File, select the, "I have a copy of my Key File available now." option, and browse for the Key File.
To restore without the Key File, the user can select the option, "I know my Username, Password and Encryption Key." option.
To restore files without the Key File, enter the Username, Password, and Encryption Key.

 If you are restoring your files from a disk drive, you will also see a field called, User Root Folder. Select the Drive and Folder containing the files you want to restore.
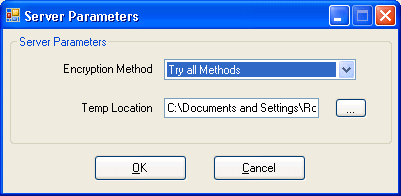 The Advanced button allows users to change the way the Web Restore Agent selects the proper Encryption Method, and they can also change the Temp Location, in case the default doesn't have enough room to perform the operation.
The Web Restore Agent will now contact the RBS Server for a list of files that can be restored, and will display the Restore screen.
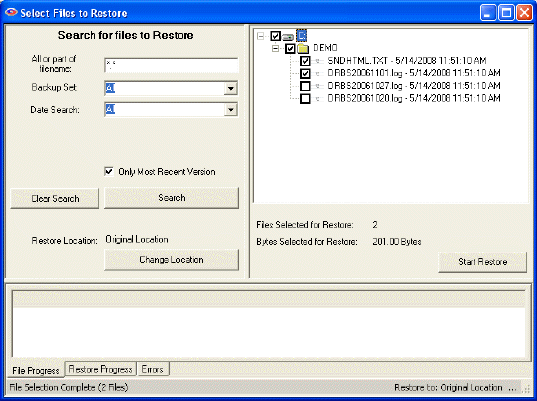
This is the main Restore screen. The left pane contains the file selection criteria. The right pane contains the files you have found in the search. Select files to restore in the right pane. The bottom pane shows the progress and results of your restore operation.
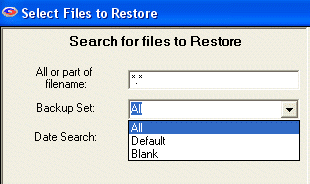 Searchfor Files to Restore
Enter any part of the file name or folder name to search for files, or leave this as *.* to search through all files.
Select which backup set to search though, or select All backup sets.
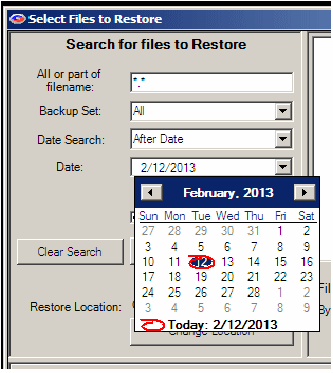 Date Search
Select OnDate, BeforeDate, AfterDate, BetweenDates, or All.
On Date: Selects files backed up on a date.
Before Date: Selects files backed up before a date.
After Date: Selects files backed up after a date.
Between Dates: Selects files backed up between two dates.
Select the date from a drop-down calendar to use in the search. If you select Between Dates, there will be two Date fields. Note: The calendars will only let you select dates for files that have been backed up.
When you have entered your search criteria, press the Search button. The files found in your search will appear in the right pane. You may now enter other search criteria to find more files, which will be added to the right pane.
To clear your search and start over again, press the Clear Search button.
After you have searched for your files, and have selected the ones you want to restore by checkmarking them in the right pane, press the Start Restore button to begin the restoration.
In the left pane, near the bottom, the current Restore Location is listed. The default is Original Locationso the restored files will be placed in the same locations from which they were backed up. To restore to a different location, select the Change Location button to select another location.
SafeByte will create the original folder structure at the new location and restore your files there.

This screen displays if you have selected to restore files to their original location (which is the default) and asks if you want to redirect the restored files to another location. If you want to over-write your current files in their original locations, answer NO to this prompt. Otherwise, answer YES, and the software will allow you to select another location for the restored files.

During the restore process you will see this progress screen in the bottom pane.
NOTE: This restorecannot be redirected. Itwill always overwrite existing SystemState.
System State can be restored like any file. Simply select it for restore. After restore, the computer must be rebooted for the restore to take effect.
NOTE: This restorecannot be redirected. Itwill always overwrite existing Active Directory.
Restart the computer in Directory Services Repair Mode.
Start SafeByte
Restore Active Directory using the SafeByte Restore interface
Restart the computer in Normal Mode.
After the restore operation is completed, the Web Restore agent will be uninstalled and removed from the computer.

The Disk Restore Agent allows your clients to restore their files without the Internet, from any removable media, without installing the Client software.
The Disk Restore Agent can be sent to your clients along with the compressed and encrypted server-side archive files containing their data. It can restore files from CDs, DVDs, Memory Sticks, or USB Drives. The Disk Restore Agent is very useful when bandwidth and data volume make an online restore impractical.
Find out how to build the Disk Restore Agent using the Customize Client Installer function in the "Customizing and Installing the Client Software" chapter.