Installation of the Web Manager and E-Commerce PlugIns should be performed by someone familiar with installing Web Servers. This is not a trivial installation. While there is an automated installer, you must manually edit the web.config file, HTML files, and IIS settings. We strongly recommend having RBS remotely install this PlugIn for you.
Even if RBS installs the PlugIns for you, you are responsible for editing the HTML files and database to include your own company name, product name, and other information specific to your business. You will need to understand HTML coding techniques to edit the HTML files, and follow instructions in other parts of this documentation to further brand your Client software and the web pages that make up these two PlugIns. This chapter includes instructions on which HTML files to edit.
|
This PlugIn requires other software from Microsoft to be installed first. These are called Prerequisites. Please install and verify all the Prerequisites (see below) before installing this PlugIn.
The Free Installation service provided with some RBS software packages includes installing the purchased software in the default location only. It does not include installing or configuring any of the Prerequisites. If you would like RBS to install and configure your Prerequisites, or to move your software to another computer, we can do so for an additional charge.
Order PlugIn Installation (including Prerequisites) Here
|
This PlugIn must be installed on the RBS Server computer in the \Web\ folder of the Application Directory.
If there is an existing web site on the server on which you will install this PlugIn, additional manual adjustments will need to be done. The installer uses only the default settings for the first web site on a server.
This installation includes two PlugIns - the Web Manager PlugIn and the E-Commerce PlugIn. While the installer installs both PlugIns, only the PlugIn(s) for which you are authorized will function. The menu system will display only features associated with the PlugIn(s) for which you are authorized.
RBS' free installation service is for a standard configuration in the default location, after all prerequisites have been installed and configured by the end user. If you want a different type of installation, different defaults, or a different location please ask your installation engineer to quote a price for this extra work.
Unless you have contracted RBS to do so, you are responsible for developing and uploading your own customized graphics, and for completing all the program defaults and branding. Full instructions are included in this documentation.
Prerequisites
The Web Manager PlugIn requires the following prerequisites. To find out how to check for these prerequisites, see "How to Check for Prerequisites" further down this page. Please note that the free installation service offered with some software packages covers only the purchased software, and not the Prerequisites.
Console login with Administrator rights
RBS Server v11 or greater installed and tested
The RBS Web Manager Installer file (RBSWebManager.exe)
Internet Information Server v6 or greater, installed and working
ASP.NET enabled
MS .NET framework versions 2.0, 3.0 and 3.5
(If the RBS Server uses the SQL Server PlugIn) SQL Management Studio Express installed
SSL Certificate installed (E-Commerce PlugIn only)
Router and Firewall setup complete.
The PlugIns must be installed in the \Program Files\RBS Server\Web\ directory.
The Web Manager Installer verifies most prerequisites (except for the SSL certificate) and will notify you if you need to install something else.
The Web Manager Installer installs a default self-signed SSL certificate for testing purposes. If you intend to make your Web Manager available on the Internet, you should purchase and install your own SSL certificate.
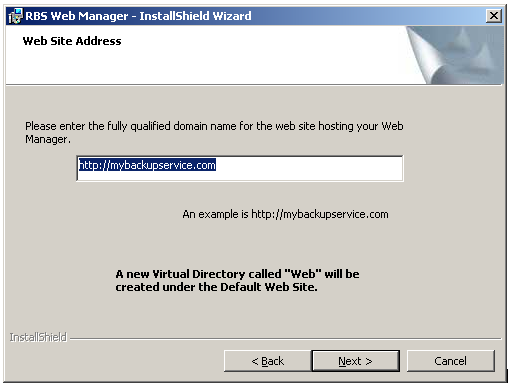
1. Run the installer file, RBSWebManager.exe on your RBS Server computer.
Enter the fully qualified URL for the website hosting your Web Manager.
The installer creates a file called web.config in the \Web\WebManager\ folder.
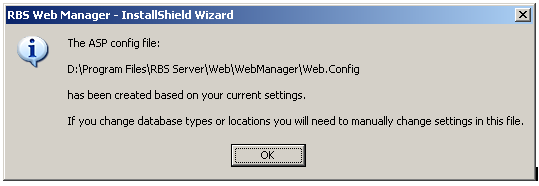
The web.config file contains settings that control how the web site works. It can be edited with any text editor (like Notepad.) Do not edit this file with MS Word or Wordpad.
Open the web.config file with Notepad and search for the following text:
<!--License Serial-->
<add key="SerialNo" value="##SERIAL##"/>
Replace ##SERIAL## with the serial number of your RBS Server, which can be found on the Help : About screen on the RBS Manager application.
Save the web.config file.
2. Verify the Security Account that IIS Uses to Run Web Manager
The account that IIS is running under when you need to make changes to the security settings. If, for example, your Web application writes to files or to a database, you'll need to grant the correct permissions to the folder or database. Before you can change these security settings, it's important the know what account IIS is using.
Accounts Used by IIS:
Windows XP: ASPNET
Windows 2003 server and above: Application Pool Identity.
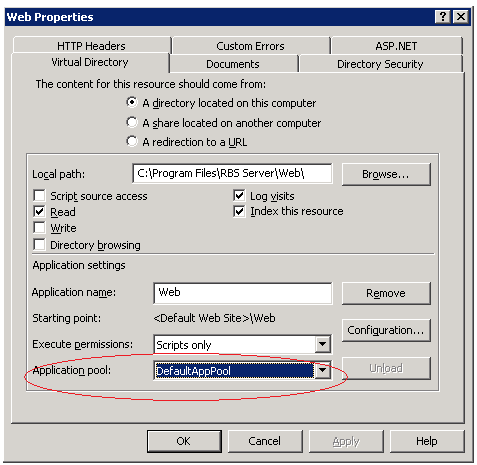
How to find out the application pool identity (screenshots are for Windows 2003 Server)
Right click on the virtual directory and select properties. Click on the virtual directory tab and make a note of the value in the Application Pool drop down control.
Expand Application Pools.
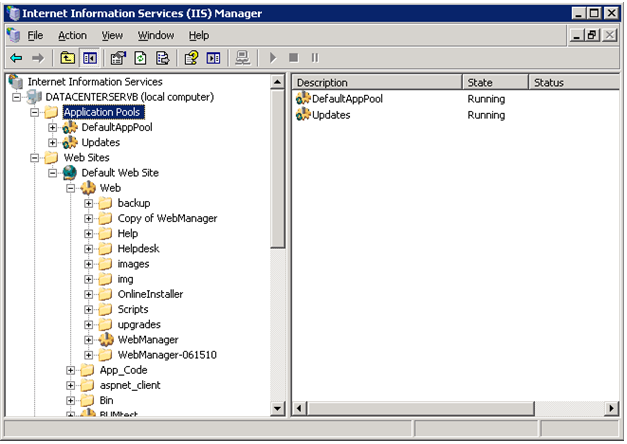
Right click on the specific application pool and select properties.
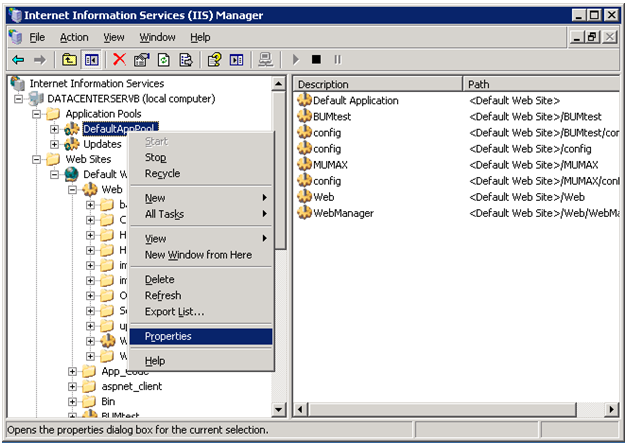
Click on the Identity tab.
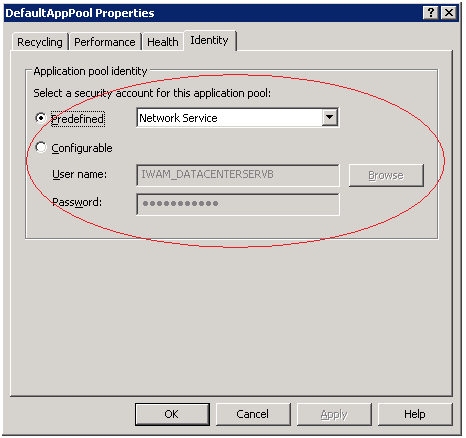
3. Set up Folder Permissions
It is mandatory to give permission to access the RBS Server folder because Web Manager will read and write files inside this folder during runtime.
Open Windows Explorer and go to the target path C:\Program Files\RBS Server. Then right click RBS Server and click Properties. In the properties window, click the Security tab.
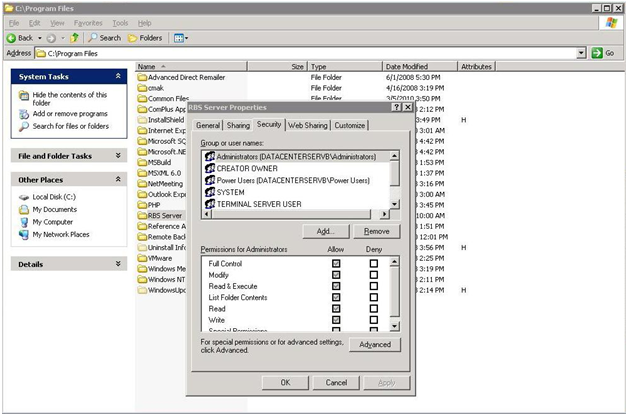
Give read and write permission to the user account from "Verify the Security Account that IIS Uses to Run Web Manager" above. Windows XP uses the ASPNET account, Windows 2003 server and above uses the application pool identity. To find out the application pool identity in your version of IIS, refer to "Verify the Security Account that IIS Uses to Run Web Manager."
If the user not found in the list then click Add button. This will show “Select Users or Groups” dialog box.
Click Advanced… button and then click Find Now button.

Select the required users from the search result and click Ok.
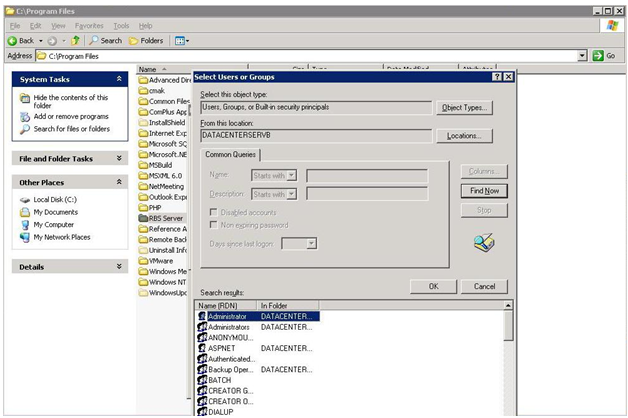
Now give full permission to the selected users.
4. Run the Application
Open Internet Explorer, and then go to the URL http://localhost/web/webmanager
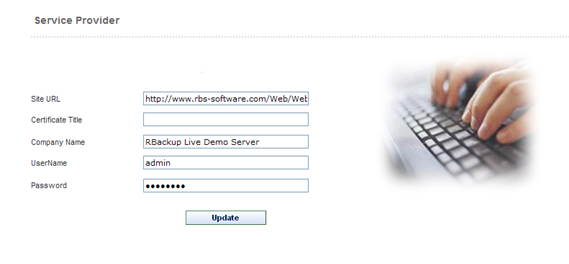
Site URL - Optional, used only if you have installed a Code Signing Certificate.
Certificate Title - Optional, used only if you have installed a Code Signing Certificate.
Company Name - Used on the Code Signing Certificate and on the End User License Agreement (EULA) to replace the macro - comp -
UserName - The administrator's login username
Password - The administrator's login password
5. Configure Email Server and Email Notifications
6. Verify Server Properties are correct.
7. Set up Account Groups (optional)
8. Set up Payment Gateways (E-Commerce PlugIn only)
9. Define Plans
10. Add Coupons (optional)
11. Set Storage Price
12. Customize (and optionally translate) Client Installers
13. Customize (and optionally translate) the Client's Help File
14. Customize (and optionally translate) the Web Manager's Web Site
Setup Complete!
Configuring the Web Manager to work with Microsoft SQL Server
(versions 2000, 2005 and 2008)
This step is necessary if the RBS Server is using SQL Server as its database. This requires the SQL Server PlugIn.
There are two steps to configure the web manager for SQL Server.
Create a new user account in SQL Server (RBS) and use it in the web manager connection string (web.config).
Setup SQL Server for SQL and Windows authentication.
Run the SQL Server Management Studio. Select Run and type ssmsee
Right click on the SQL Instance and select Properties.
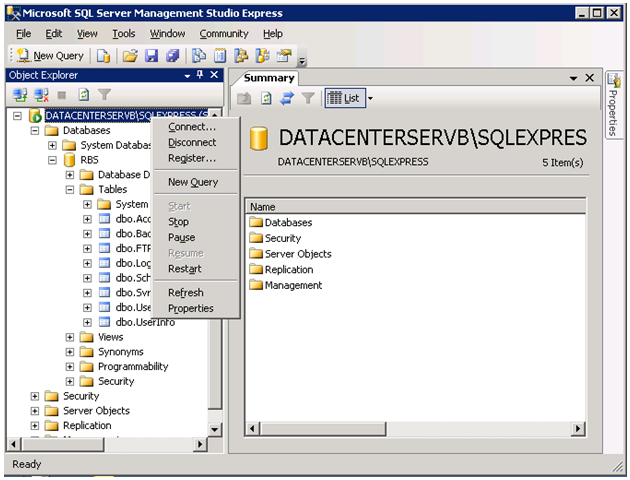
Select Security in the left-hand side and select “SQL and Windows Authentication mode”

Expand the “RBS” database, expand the Security node.
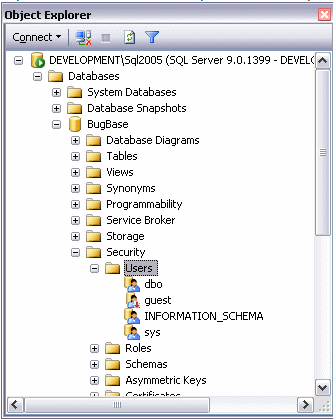
Right-click the Users/Logins node and choose New User/New Login.
In the Username text box, type MyWebsiteUser.
In theLogin Name text box, type MyWebsiteUser. Alternatively, you can click the little button with the three ellipses and browse for the user name.
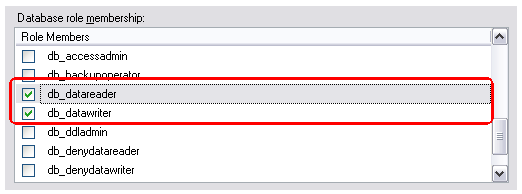
At the bottom half of the screen, you see a box labeled Database role membership. In this box, you can choose a number of roles that you want to grant to your new user. Give users as few permissions as possible. A good choice is db_datareader and db_datawriter that allows the account to both read from and write to tables in the database.
Now change the web manager web.config file to connect to this SQL instance with the created username and password. Open the \webmanager\web.config file with Notepad and search for the following text:
<!--RBS Server Database Type 0-Access, 1-SQL Server-->
<add key="DBType" value="##RBSSERVERDBTYPE##" />
<!--Web Manager Database Type 0-Access, 1-SQL Server-->
<add key="ClientDBType" value="##CLIENTDBVALUE##" />
<add key="managerdb" value="##MANAGERDB##"/>
Change ##RBSSERVERDBTYPE## to 1
Change ##CLIENTDBVALUE## to 1
Change ##MANAGERDB## to Server=DATACENTERSERVB\SQLEXPRESS;Initial Catalog=RBS;User ID=MyWebsiteUser;password=Pa$w0rD
(For the above value, use the actual username and password.)
Save the web.config file.
Installation Workarounds
Error: Could not load type ‘System.ServiceModel.Activation.HttpModule’ from assembly ‘System.ServiceModel, Version=3.0.0.0, Culture=neutral, PublicKeyToken=b77a5c561934e089'.
This is an unhandled exception during the execution of the current web request. Please review the stack trace for more information about the error and where it originated in the code.
Exception Details: System.TypeLoadException: Could not load type
‘System.ServiceModel.Activation.HttpModule’ from assembly ‘System.ServiceModel, Version=3.0.0.0, Culture=neutral, PublicKeyToken=b77a5c561934e089'.
Resolution
To resolve this issue, run the following from command line:
For 32 bit systems:
C:\WINDOWS\Microsoft.NET\Framework\v2.0.50727\aspnet_regiis.exe /iru
For 64 bit systems:
C:\WINDOWS\Microsoft.NET\Framework64\v2.0.50727\ aspnet_regiis.exe /iru
Not showing the Chart image in dashboard.
Resolution
In IIS7, click on the Web Manager node and then click ‘Add the managed handler’ link on the right side.
Then input the below information in the following order:
ChartImage.axd
Telerik.Web.UI.ChartHttpHandler, Telerik.Web.UI
ChartHandler
How to Check for Prerequisites
Administrator Privileges
Make sure you have an Administrator's login. If RBS technicians are installing they will need this login.
RBS Server v11 or greater installed and tested
Run the RBS Manager console application.
Select Help : About
Read the version number.
If the RBS Server is not installed, or if its version number is less than 11, install or upgrade it at the Products Download page.
Is IIS (Internet Information Services or Application Server) installed?
Open Run
Type inetmgr
If IIS installed, this will open the IIS Manager application
If IIS is not installed, install and configure it. Search Microsoft Technet for more information.
Note: If IIS is installed prior to .NET framework installation, then please follow the steps:
Open command prompt (Open Run and then type CMD)
Change to the following directory
(for 32 bit systems) C:\WINDOWS\Microsoft.NET\Framework\v2.0.50727
(for 64 bit systems)C:\WINDOWS\Microsoft.NET\Framework64\v2.0.50727
Type aspnet_regiis.exe –i
Is .Net framework 2.0, 3.0 and 3.5 installed?
Open control panel -> Add or Remove programs
Look for Microsoft .NET Framework (all three versions)
If .NET (all three versions) is not installed, install it. Search Microsoft Technet for more information.
Note: please reboot the system after the .NET framework install is done.
Is ASP Installed?
Open Service Manager (enter services.msc from Run).
Look for “ASP.Net State Service” and see if it is Started.
If it is not started, then start the service and change the startup type to “Automatic”.
Is Asp.Net enabled in IIS? (These instructions vary for different operating systems)
Open Control Panel
Select Administrative Tools
Select Internet Information Services
Expand your computer name
Click on "Web Service Extensions."
Make sure "ASP.NET" status is “Allowed”, if not, then right click and click enable
Search Microsoft Technet for more information.
Is SQL Server Management Studio installed? (Only necessary if the RBS Server uses the SQL Server PlugIn)
Open Run
Type ssmsee
If the software starts, it is installed.
If the software does not start, it is not installed. Download it and install it from the Microsoft download site.
SSL Certificate installed (E-Commerce PlugIn only)
While an SSL certificate is not required by the software, it is strongly recommended if you are going to provide web access to the public. Any certificate authority can provide an SSL certificate. Prices start at about $29 per year.
For instructions on installing your SSL certificate, see the Microsoft Support site. Search for "How to implement SSL in IIS"
A self-signed certificate is installed by default for testing. You can replace it later.
Router and Firewall Setup
Since the RBS Server should already be installed and tested, the firewall and router should have also been properly set up. If you still need to set up your router and firewall, you can find instructions at the following link.
For the Web Manager and E-Commerce PlugIns you will need to handle ports 80 and 443 the same way the documentation at the above link suggests handling port 2774.